
10 Steps to a Hassle-Free Automatic Gate Installation
- Christian D
- Dec 29, 2025
- 6 min read


Thinking about upgrading your home’s security with an automatic gate but feeling overwhelmed by the installation process? You’re not alone. Many suburban homeowners, especially those in areas like Los Angeles, Santa Barbara, or Vernon,
are choosing automatic gates to enhance their property's security, curb appeal, and convenience. However, when it comes to installing one, it’s essential to follow the right steps to ensure a smooth and hassle-free experience.
Whether you’re new to the process or considering upgrading an old system, this guide will walk you through the 10 steps to a successful automatic gate installation. With the right planning and professional help, you can enjoy your new gate without the stress.
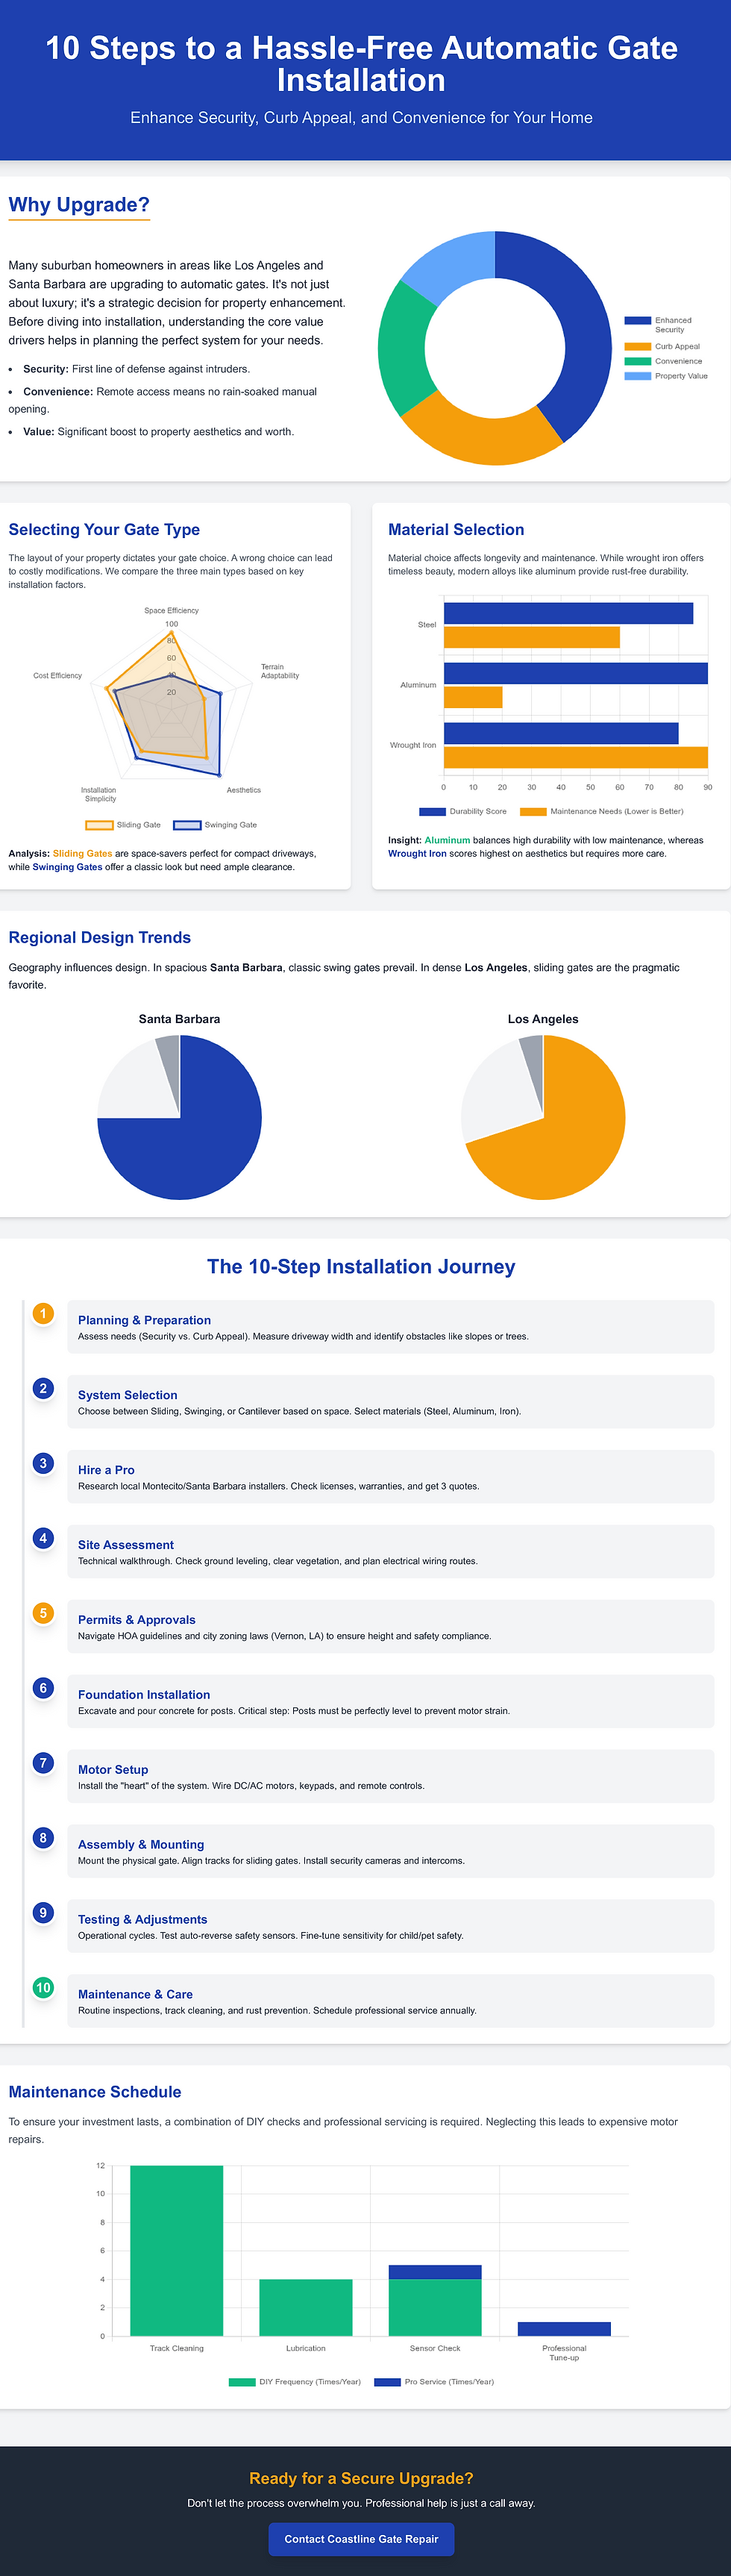
Why Choosing the Right Gate System Matters
Before diving into the installation process, it’s crucial to select the right automatic gate system for your needs. The type of gate you choose will impact the security, functionality, and aesthetic appeal of your home. Automatic gates come in various styles—sliding, swinging, and cantilever—and materials, such as steel, aluminum, and wrought iron.
In suburban areas like Santa Barbara, where homes often feature spacious driveways, you may prefer a classic swing gate. Meanwhile, a sliding gate might be ideal for homes in Los Angeles where driveway space is more limited. This decision will impact the entire installation process, so it’s essential to choose carefully.
Step 1: Initial Planning and Preparation
Before you get started, take time to assess your property and figure out what kind of gate system is right for you. This is your chance to set clear goals for your automatic gate.
Determine Your Needs: Why do you want an automatic gate? Is it for enhanced security? Or do you want to boost your property’s curb appeal? Some homeowners want a combination of both, but defining your primary goal will guide the installation process.
Assess Property Layout: Take note of your driveway’s size, the entrance’s shape, and any obstacles that might affect the gate’s movement. If you have a long driveway, a sliding gate might work best. On the other hand, if you have more space, a swing gate could be a great choice.
Research Local Regulations: Depending on where you live, you may need permits to install an automatic gate. In places like Los Angeles, certain neighborhoods or HOA communities might have specific guidelines, so double-check before you start.
Step 2: Choosing the Right Automatic Gate System
Choosing the right gate system is vital to achieving a smooth installation and long-lasting functionality.
Gate Type: There are three main types of automatic gates:
Sliding Gates: Best for homes with limited space or those with narrow driveways.
Swinging Gates: Perfect for homes with larger entrances, but requires more space to swing open.
Cantilever Gates: Ideal for uneven terrain or areas with slopes, as they don’t require a track on the ground.
Material Selection: The material affects both the look and durability of your gate. For a sleek and modern look, aluminum or steel gates work well. If you’re after a more traditional or ornate look, wrought iron gates are a beautiful choice.
Customization Options: Consider features like security keypads, video intercom systems, or remote access controls. These can add convenience and extra protection to your gate system.
Step 3: Finding a Professional Gate Installer
While DIY might be tempting, installing an automatic gate requires specialized knowledge. Hiring a professional installer ensures that the gate operates properly and complies with all safety regulations.
Researching Installers: Start by searching for local gate installation companies with good reviews. In areas like Santa Barbara and Montecito, look for companies experienced with automatic gate installation for homes.
Questions to Ask: When interviewing potential installers, ask about their experience, licensing, warranties, and how long the installation will take. It’s also wise to get at least three quotes to compare pricing and services.
Step 4: Site Assessment and Preparation
Once you’ve selected your installer, it’s time for them to assess your property’s layout.
Evaluating the Installation Area: The installer will evaluate whether your site is suitable for the chosen gate type. They’ll consider ground leveling, space for the gate’s movement, and accessibility to power sources.
Site Clearing: Any obstacles—such as trees, shrubs, or debris—must be cleared from the installation area. This ensures that the gate has adequate space to move freely and doesn’t get obstructed during operation.
Preparing for Electrical Components: If your gate requires electrical work, your installer will need to assess the nearest power source and make preparations for wiring.
Step 5: Obtaining Permits and Approvals
In most cases, you’ll need permits before installing an automatic gate. Depending on your location (such as Los Angeles or Vernon), the process may involve multiple steps.
Why Permits Are Necessary: Permits ensure that your installation complies with local building codes, ensuring safety and functionality. Some areas may also have restrictions on gate heights or designs, so checking ahead can save you time and headaches.
Navigating Local Regulations: Many suburban areas have HOA guidelines or local zoning laws that could impact your installation. Be sure to consult with your installer to ensure everything is in order.
Step 6: Installing the Gate Foundation
The foundation is crucial for ensuring your automatic gate remains stable and functions properly over time.
Foundation Work: The gate’s posts must be firmly set in the ground, often requiring concrete for stability. The installer will pour concrete around the gate posts to anchor them securely.
Leveling and Alignment: The posts must be level and aligned correctly to ensure the gate moves smoothly without dragging or becoming misaligned.
Material Considerations: The material of your gate (e.g., steel, aluminum) will determine the type of foundation required. Heavy-duty gates require sturdier foundations to withstand wind and weather.
Step 7: Setting Up the Gate Motor and Mechanism
The motor is the heart of your automatic gate, and it needs to be set up properly to ensure smooth, reliable operation.
Choosing the Right Motor: Different gate types and materials require different motors. A DC motor is commonly used for residential gates, offering smoother operation and better efficiency. For heavier gates, an AC motor may be needed.
Electrical Setup: If your gate system has keypads, intercoms, or remote controls, your installer will wire them to the motor and ensure everything is integrated properly.
Testing the Motor: Once everything is installed, the motor will be tested to ensure that it opens and closes the gate with ease.
Step 8: Gate Installation and Assembly
At this stage, the gate itself is installed and carefully aligned to ensure it operates smoothly.
Post Installation: The gate is mounted securely onto the posts, ensuring it is level and properly positioned. This step is essential to avoid any future mechanical issues or misalignments.
Aligning Tracks: If you’ve chosen a sliding gate, tracks need to be installed and aligned correctly for smooth movement. This is also the time to adjust any mechanical components to ensure the gate operates smoothly.
Fitting Additional Features: This is the time to add intercom systems, security cameras, or other high-tech features that enhance the gate’s functionality.
Step 9: Final Testing and Adjustments
Once the installation is complete, the final step is to test the gate to ensure everything works as it should.
Operational Testing: The installer will test the gate by running it through several cycles. They’ll check for any alignment issues, ensuring that it opens and closes smoothly.
Safety Checks: The gate should stop or reverse if an obstruction is detected. Installers will adjust the sensors to ensure that the gate doesn’t close too quickly or cause any safety hazards.
Adjusting Sensitivity: The gate’s sensitivity is adjusted so it won’t close when there’s an object in the way, protecting children and pets from accidents.
Step 10: Ongoing Maintenance and Care
Once your automatic gate is installed, proper maintenance will ensure its longevity and smooth operation.
Routine Inspections: Regularly check the motor, tracks, and sensors to ensure everything is functioning as it should. Lubricate the moving parts and ensure the tracks are free of debris.
Cleaning and Upkeep: Clean the surface of the gate regularly to prevent dirt and debris buildup. If your gate is made of materials like wrought iron, you may need to treat it with a protective coating to prevent rust.
Professional Service: It’s recommended to have your gate professionally serviced at least once a year to keep it operating at peak efficiency.
Conclusion: Enjoy Your Hassle-Free Automatic Gate Installation
Installing an automatic gate might seem like a big undertaking, but by following these 10 steps, you can ensure a smooth and stress-free process. From planning to installation and maintenance, taking the time to properly prepare will save you headaches in the long run.
If you’re ready to take the next step and install an automatic gate at your home, Coastline Gate Repair is here to help. Our expert team specializes in providing hassle-free gate installations that meet your needs and exceed your expectations. Contact us today to get started!


Comments